
Costs 5 euro (excluding mail costs)
http://www.quiltwebshop.nl/
Or you can buy it at my show-and-tells.
Het patroon is vanaf 28 november 2015 verkrijgbaar in de Quiltwinkel 100 rozen in Deventer
Kosten 5 euro (exclusief verzendkosten)
http://www.quiltwebshop.nl/
Of je kunt het kopen tijdens één van mijn show-and-tells.
Ben je geïnteresseerd in een show-and-tell van mijn antieke quilts neem dan contact op via de email: caroline.dijkerman@gmail.com
Interested in one of my show-and-tells please contact me by e-mail: caroline.dijkerman@gmail.com
Feedsacks - voeder/voedsel zakken
 |
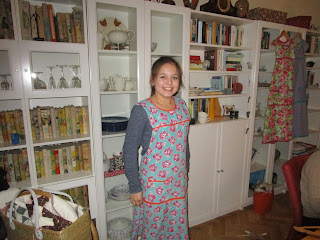
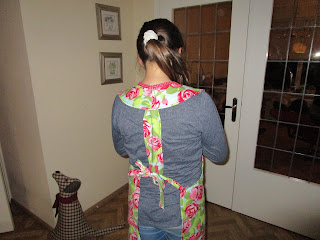
| Jeltje from the 100 roses in Deventer looks also lovely in this apron |
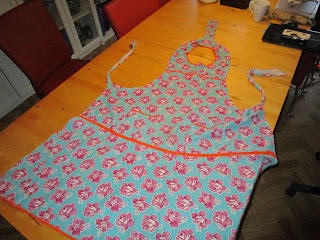
During the depression years in the 1930s in the USA feed sacks were very popular. There was big competition between the mills to see who had the best designs. After washing off the labels, feedsacks were used for clothes, towels, cushions and of course quilts. They made feed sacks until the 50s, after that they used paper bags for sugar, flour etc. I found this apron whilst travelling in the USA. I hope you enjoy making this apron as much as I did.
Instruction in english

- Fabric 1m35, width of fabric 1m10
- Biaisband 4 metres
- Biaisband 4 metres
The pattern has 8 – 10 parts (see patroondelen). The orginal pattern shows that the skirt is made of 3 parts, you can also choose to make the skirt in one part. The reason for this is that feed sacks were a certain size, so there was not enough fabric to make the whole skirt out of one piece.
 The pattern includes seam allowances. You can easily make the pattern smaller or bigger depending on your height.
Cut out all the patterns and put them down on the fabric, look at the cutting scheme.
- Start with the skirt and sew the two extra feedsack at the skirt.
- Sew a biaisband at the top of the pocket. Fold the side seams and sew the pocket on the front bodice.
- Sew the front bodice and skirt together. Sew a biaisband at the front over the seam.
- Sew the shoulder part at the front bodice. Sew a biasband at the front over the seam.
- Sew the shoulders in the middle together.
- Sew a biasband along the bottom of the skirt and the neckline.
- Sew seams all around the apron.
- Make two buttonholes on the backband, or sew two strings. If you do buttonholes use extra fabric to make it more sturdy.
- Sew a seam all around the backband.
- Sew the backband in the middle at the shoulderpart.
- Sew the two ties and then sew them on to the apron.
 7. Middenachter:
maak twee lussen of twee knoopsgaten. Het oorspronkelijke patroon heeft zelfs twee
gepaspileerde knoopsgaten. Stik een zoom rondom. Naai het smalle stuk vast aan
het midden van het schouderstuk.
7. Middenachter:
maak twee lussen of twee knoopsgaten. Het oorspronkelijke patroon heeft zelfs twee
gepaspileerde knoopsgaten. Stik een zoom rondom. Naai het smalle stuk vast aan
het midden van het schouderstuk.


If you have any questions please email me: caroline.dijkerman@gmail.com
Werkwijze
De schort bestaat
uit 8 delen, de rok kan ook uit 1 stuk worden gemaakt, maar het originele
patroon laat twee zijstukjes zien. Dit had te maken met het feit dat een
feedsack een bepaalde afmeting had en ieder stukje stof werd gebruikt.
1. Leg
alle patronen op de stof en knip deze uit met 1 cm naadtoeslag.
2. Naai
de rok met de twee zijstukken (feedsack extra) aan elkaar.
3. Werk
de zakken van de bovenkant af met een biaisbandje. Stik de zakken op het
bovenlijf.
4. Stik
de rok en het bovenlijf aan elkaar.
5. Stik
het schouderstuk aan het bovenlijf. Sluit de halslijn en stik deze vast.
6. Stik
een biaisband langs de zoom van de rok, langs de binnenkant van de halslijn.
Stik het biaisband over de naad van rok-bovenlijf en bovenlijf-schouderstuk.
 7. Middenachter:
maak twee lussen of twee knoopsgaten. Het oorspronkelijke patroon heeft zelfs twee
gepaspileerde knoopsgaten. Stik een zoom rondom. Naai het smalle stuk vast aan
het midden van het schouderstuk.
7. Middenachter:
maak twee lussen of twee knoopsgaten. Het oorspronkelijke patroon heeft zelfs twee
gepaspileerde knoopsgaten. Stik een zoom rondom. Naai het smalle stuk vast aan
het midden van het schouderstuk.
8. Werk de rest van de schort af met een zoom.
9. Stik de schortbanden, en zet deze
vast aan het bovenlijf.


3 opmerkingen:
Wat leuk.. Dit gaat vast een succes worden.
Groetjes.
Wat leuk, Caroline ! Hier krijg je vast veel vraag naar !
Enig hoor! Kom gerust weer eens buurten op donderdag! Ik wil zeker een patroon!
Een reactie posten